
Scan
The Scan page is the main EASM workspace for starting and managing external attack surface scans. Users can enter an approved target, select how the scan should run, define scheduling options, confirm authorization, and launch an assessment against internet-facing assets.
Where to Find It
Open the main navigation menu and go to:
Navigation path
Application route
/scanpage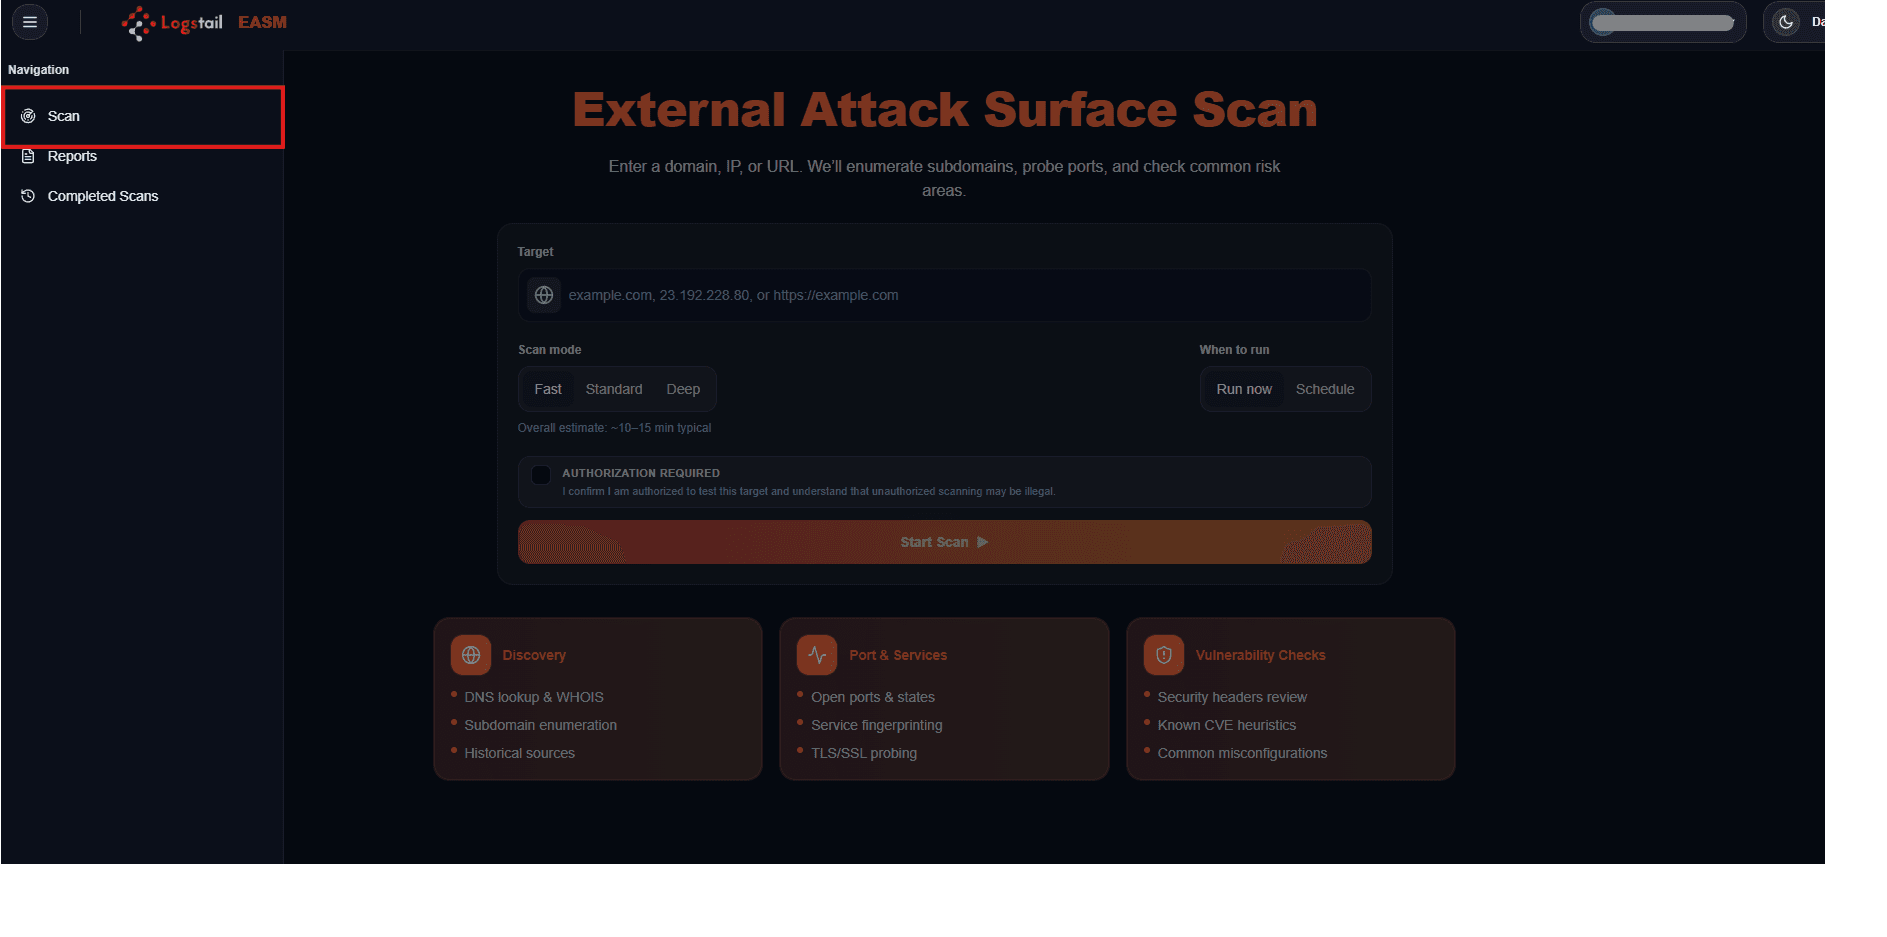
What This Page Is Used For
Use the Scan page to assess approved external assets such as:
The scan helps identify exposed services, misconfigurations, weak security settings, and other external risks that may increase attack surface exposure.
Important Authorization Requirement
Authorization required
Only scan assets that you own or are explicitly authorized to test. Before a scan can start, users must confirm authorization by selecting the authorization checkbox. Unauthorized scanning may be illegal and should not be performed.
Before You Start
Before starting a scan, confirm that you have:
Main Page Areas
The Scan page includes:
Target input
Enter the approved domain, URL, or public IP address that should be scanned.
Scan mode selection
Choose the scan mode or scan configuration before starting the assessment.
Run or schedule
Select whether to run the scan immediately or schedule it for later.
Scheduling controls
Configure the scan schedule when the assessment should run at a specific time.
Authorization checkbox
Confirm that the target is owned by you or that you are authorized to assess it.
Primary action button
Start the scan or save the scheduled scan using the primary page action.
Information cards
Review supporting guidance, scan context, and important page-level details.
Live results panel
Monitor live scan output and progress while an active scan is running.
Target Input
The target input is where users define the asset to scan.
Supported target examples include:
Use a clean and specific target whenever possible. If scanning a web application, include the URL. If scanning infrastructure, use the domain, subdomain, or public IP address.
Scan Modes
The Scan page supports different scan modes so users can balance speed, depth, and coverage.
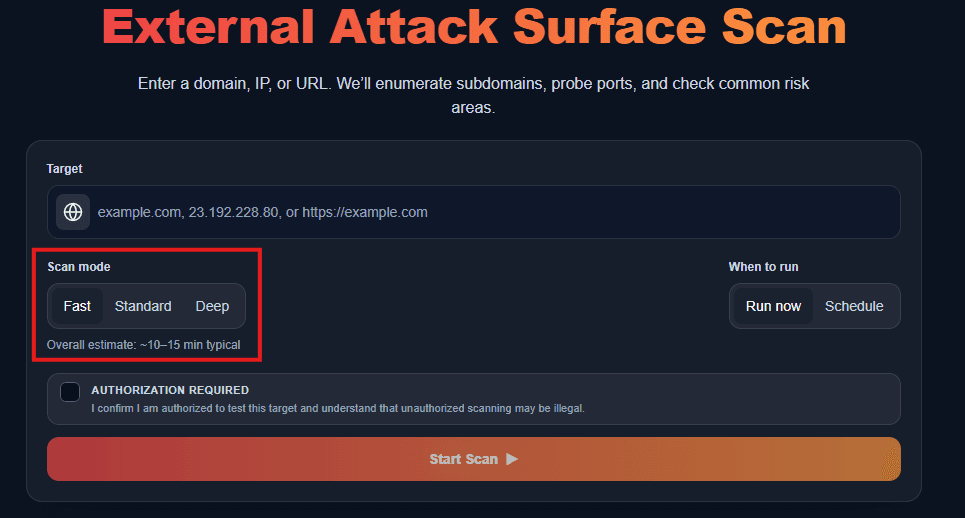
Scan mode selection
Choose the scan mode based on urgency, target sensitivity, and the level of detail required. Deeper scans may take longer and should be planned for sensitive production assets.
Fast Mode
Use Fast mode for quick checks.
Fast mode is useful when:
Validate targets quickly
Validate a target quickly before running deeper review.
Run initial exposure checks
Run an initial exposure check against the selected target.
Check exposed services
Check whether basic services are exposed to the internet.
Perform lightweight reviews
Perform lightweight daily or ad hoc reviews.
Standard Mode
Use Standard mode for balanced coverage.
Standard mode is useful when:
Run regular checks
Run regular external exposure checks.
Review with moderate depth
Review a target with moderate scan depth.
Validate assets and services
Validate discovered assets and exposed services.
Monitor EASM routinely
Perform routine EASM monitoring.
Deep Mode
Use Deep mode for more complete review.
Deep mode is useful when:
Perform monthly reviews
Perform monthly external exposure reviews.
Investigate high-value assets
Investigate high-value external assets.
Review critical targets
Review critical domains or public IP addresses.
Look for deeper findings
Look for broader exposure and deeper findings.
Deep scans take longer than fast or standard scans.
Run Now
Select Run Now to start the scan immediately.
When Run Now is selected, the primary button starts the scan as soon as required fields are completed and authorization is confirmed.
Use Run Now when:
Investigate exposure
Investigate a current exposure.
Test new assets
Test a newly added asset.
Validate remediation
Validate remediation after changes are applied.
Run spot checks
Perform a quick spot check.
Schedule
Select Schedule to create a scan that runs later or on a recurring basis.
Scheduled scanning is useful for continuous attack surface visibility. It helps teams detect exposure drift over time instead of relying only on manual checks.
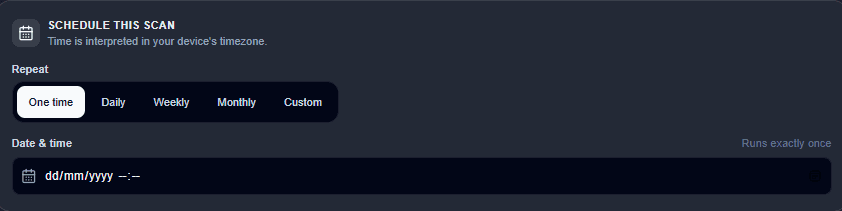
Scheduling options include:
One-time schedule
Run the scan once at a specific date and time.
Recurring schedule
Run scans on a daily, weekly, or monthly recurrence.
Custom cron schedule
Use a cron-style expression for advanced scheduling patterns.
Examples of useful schedules:
Weekday morning scan
Run every weekday at 6 AM.
Monthly kickoff scan
Run on the first Monday of each month.
Frequent monitoring
Run every 6 hours.
Monthly deep review
Run a monthly deep review of critical assets.
Primary Action Button
The primary action button changes based on the selected execution mode.
Start Scan
Shown when Run Now is selected. Starts the scan immediately after the target, scan mode, and authorization checkbox are complete.
Schedule Scan
Shown when Schedule is selected. Saves the scan schedule after the target, scan mode, schedule settings, and authorization checkbox are complete.
Information Cards
The bottom section of the Scan page includes summary cards explaining what the scan performs.
Discovery
The Discovery card represents asset discovery.
It includes checks such as:
Discovery helps identify assets linked to the target.
Port & Services
The Port & Services card represents publicly exposed network services.
It includes checks such as:
This helps determine which services are reachable from the internet.
Vulnerability Checks
The Vulnerability Checks card represents security testing.
It includes checks such as:
This helps identify common weaknesses and external exposure issues.
Quick Immediate Scan Workflow
Use this workflow when you need a fast scan right now.
Scheduled Monitoring Workflow
Use this workflow when you want recurring visibility.
Live Results Panel
The Live Results panel appears while a scan is actively running. It gives real-time visibility into scan progress and early findings without waiting for the scan to fully complete.
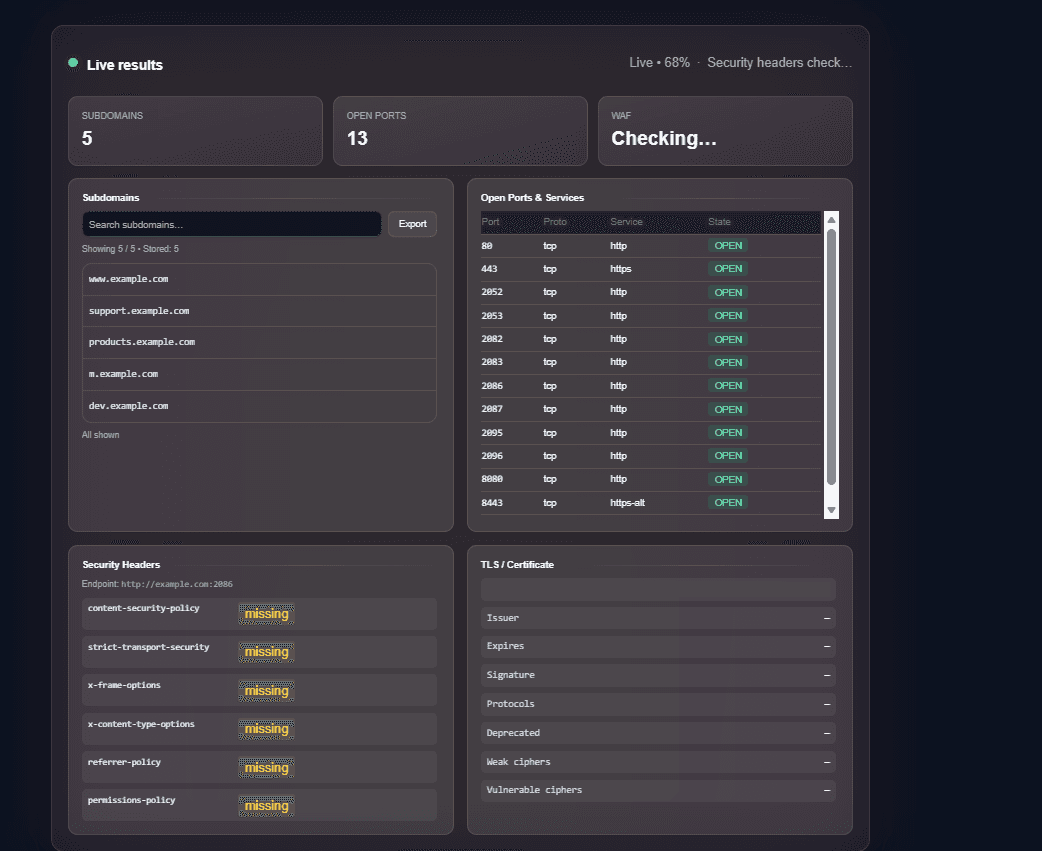
Use the Live Results panel to:
Confirm scan status
Confirm the scan is running.
Track progress
Track progress percentage.
View current module
See the current scan module.
Review early assets
View early discovered assets.
Watch open ports
Review open ports as they are found.
Monitor security checks
Watch security checks as they complete.
Live Results Status
Live scan status
A green status dot indicates that the scan is active and live updates are being received. A status such as Live • 68% • Security headers check… means the scan is running, partially complete, and currently executing the shown module.
Live
The scan is currently running.
68%
Estimated completion progress.
Security headers check
The current scan module being executed.
Live Results Summary Cards
During a running scan, summary cards can show early scan output.
Examples include:
Subdomains
Shows the number of discovered subdomains.
Open Ports
Shows the number of publicly reachable ports detected.
WAF
Shows Web Application Firewall detection status.
Security Headers
Shows whether important HTTP security headers are present, missing, or weak.
TLS Certificates
Shows TLS certificate details such as issuer, validity, expiration, and certificate status.
After the Scan Completes
After the scan finishes, users should review the related result pages and report outputs.
Recommended next steps:
Common Findings
EASM scans can help identify:
Safe Scanning Guidelines
Follow these rules before starting scans:
Scan authorized assets
Scan only assets you own or are authorized to test.
Avoid third-party targets
Avoid scanning third-party assets without written approval.
Use Fast mode
Use Fast mode for quick checks.
Use Deep mode
Use Deep mode for planned reviews.
Schedule recurring scans
Schedule recurring scans for continuous visibility.
Review completed scans
Review results and reports after scans complete.
Coordinate production scans
Coordinate scans for sensitive production assets.
Document authorization
Document authorization for customer or third-party environments.
Troubleshooting
Start Scan is disabled
- 1
Confirm that the target is entered.
- 2
Confirm that a scan mode is selected.
- 3
Confirm that the authorization checkbox is checked.
Schedule Scan is disabled
- 1
Confirm that the target is entered.
- 2
Confirm that the scan mode is selected.
- 3
Confirm that schedule, date/time, recurrence, and authorization are complete.
Scan does not start
- 1
Check that the target format is valid.
- 2
Confirm authorization is checked.
- 3
Review platform connectivity and retry the scan.
Live results do not appear
- 1
Confirm that the scan is currently running.
- 2
Refresh the page if the scan was just started.
- 3
The scan may have completed quickly before live results appeared.
Scan takes longer than expected
- 1
Deep scans and broad targets can take longer.
- 2
Use Fast or Standard mode for quicker checks.
- 3
Review scan history to confirm whether the scan is still running.
Results look incomplete
- 1
Confirm that the target is correct.
- 2
Confirm that the target is reachable.
- 3
Some targets may block probes, limit responses, or expose minimal data.
Best Practices
Start with Fast or Standard
Use Fast or Standard mode when testing a target for the first time.
Use Deep mode carefully
Use Deep mode for scheduled monthly reviews or high-value external assets.
Schedule recurring scans
Schedule recurring scans for important domains and public IP addresses.
Review reports
Review Reports after scans complete so findings are documented and shareable.
Validate high-risk findings
Validate high-risk findings before escalation.
Keep authorization records
Keep authorization records for every target that is scanned.
Prioritize unexpected services
Treat unexpected public services as priority investigation items.